Administrators in business environments will almost always recommend (or require) their users to save data on network servers rather than on their local systems. Servers typically have better network security and are more easily backed up than end-user workstations. Collaboration is also much simpler since all users can be granted access to network servers regardless of the presence or status of user computers. Centralized storage solutions make managing storage capacity, access rights, drive performance, data recovery and data security easier.
Windows systems use mapped network drives for this solution. Mapped network drives mount or attach a folder shared from another system to an available drive letter on the local system. In other words, a shared Sales folder could be attached to the S: drive on your local Windows computer, and a shared Marketing folder could be mapped to the M: drive. The folder could be shared from a Windows file server or even a network-attached storage (NAS) device.
Windows has multiple ways to map network drives, including graphical interface and command line options. This article reviews these options, enabling you to find the solutions that work best for your environment.
Share a folder
You can follow the steps in this article if you have two networked Windows systems. All you need to do is share out a folder from one system (think of this system as the "server"). You'll access the share from the second system (think of it as the "client").
On the server system, create a new folder on the C: drive named demo and share it out. The steps to share the folder are displayed below.
Create the demo folder:
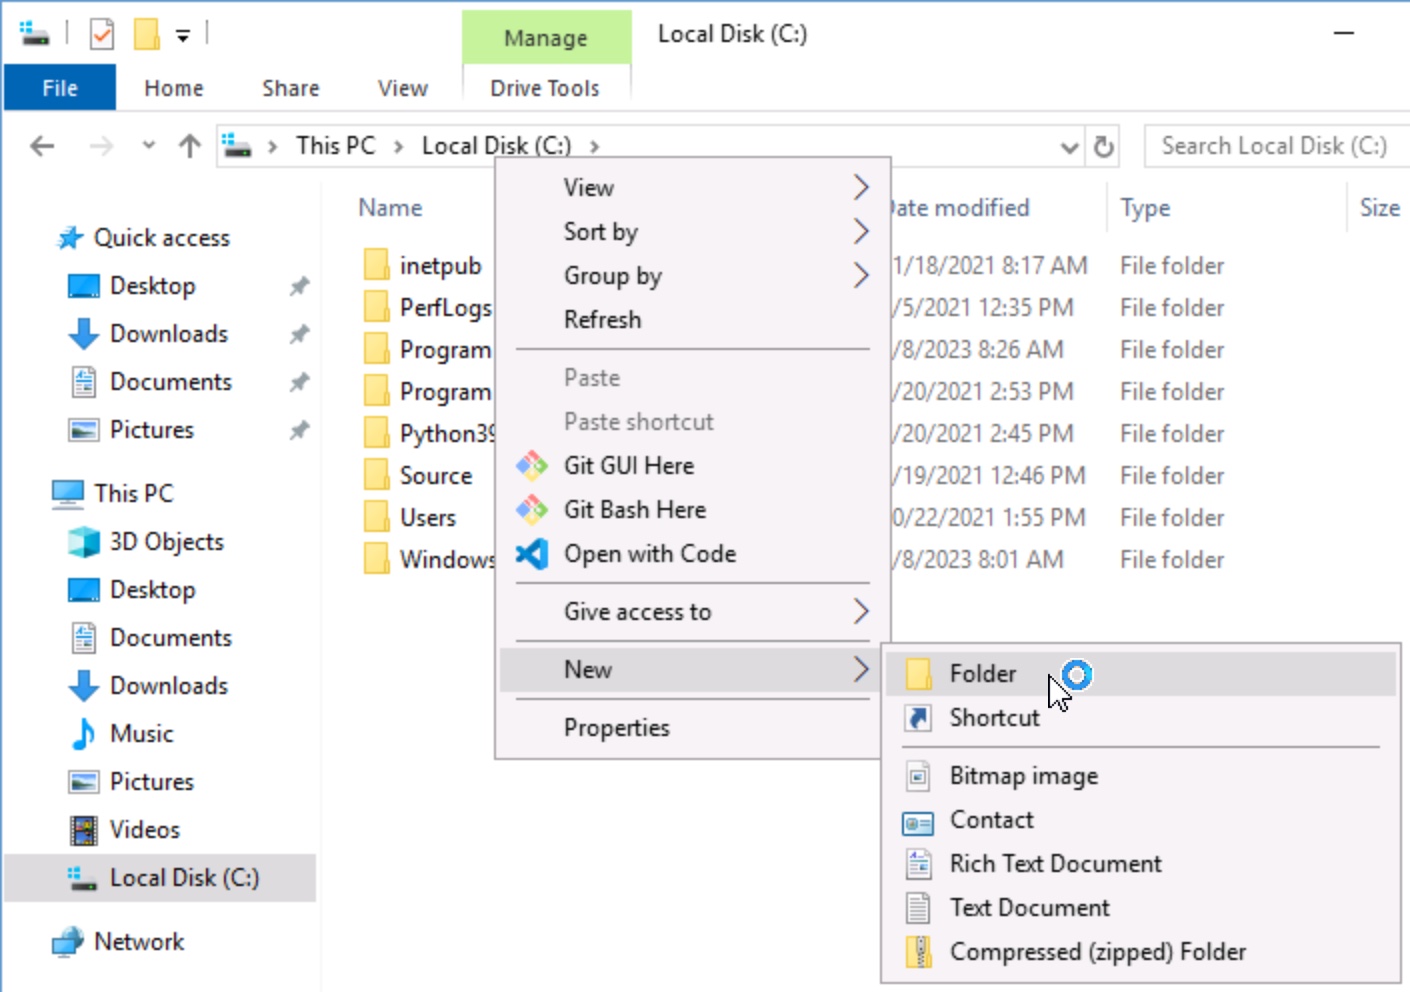
Figure 1: Create a folder named demo
After you create the folder, right-click it and choose Properties. Select Advanced Sharing from the Sharing tab:
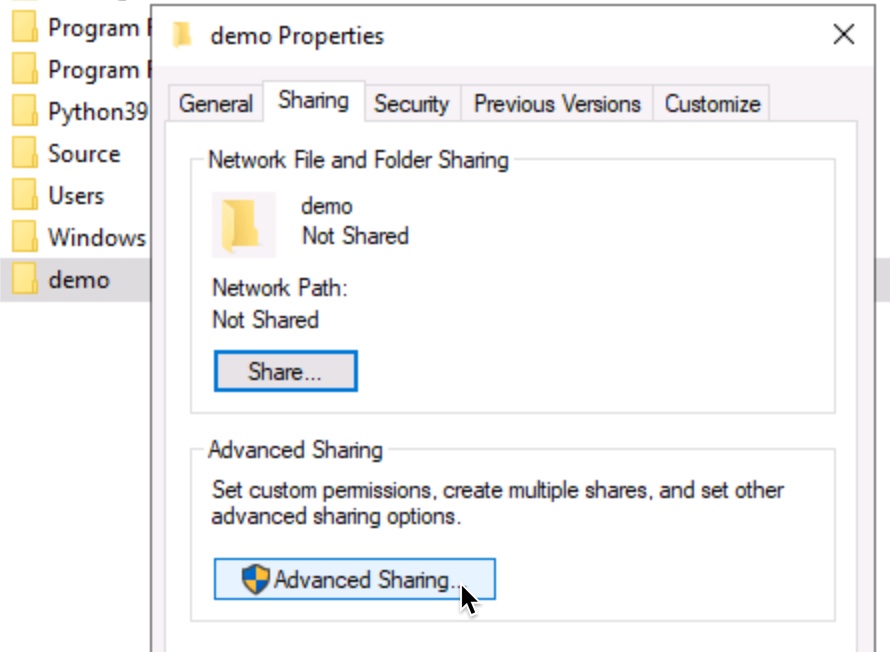
Figure 2: Share the demo folder using the Advanced Sharing options
Tick the box for Share this folder and name the share demo:
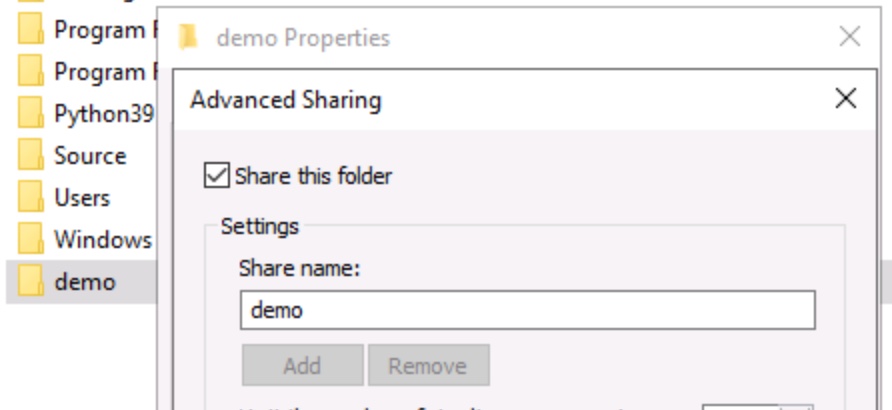
Figure 3: Share the folder and name the share "demo"
On the same interface, select Permissions. Set the Share permissions at Full Control for the Everyone group:
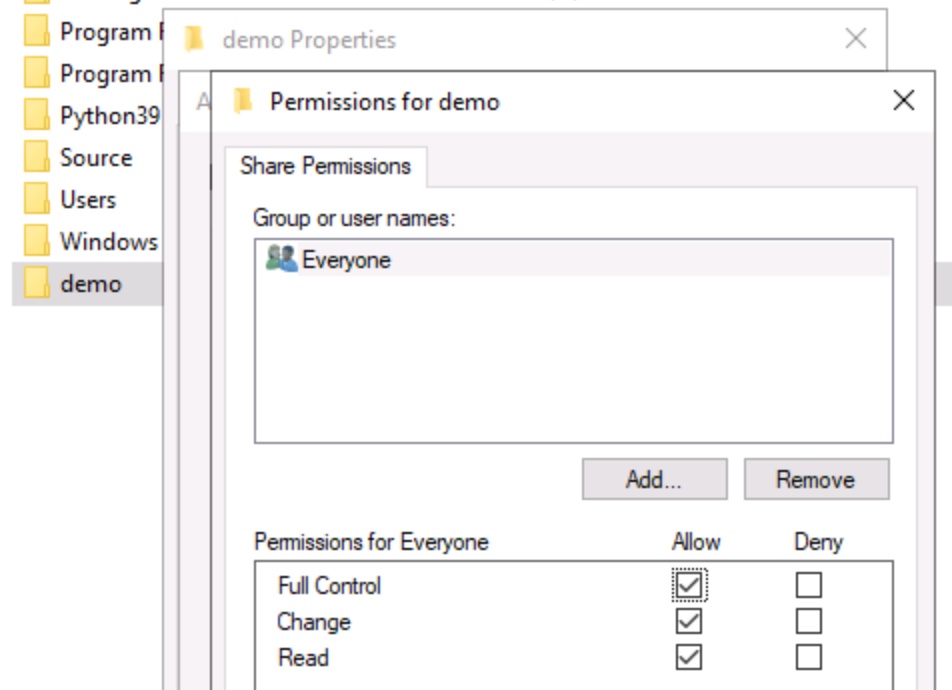
Figure 4: Set the Share permissions at Everyone Full Control
Note that the Full Control Share permission for the Everyone group is usually only appropriate for lab or other non-production environments.
Confirm the share is visible by using the net view command from the Command Prompt. Use the Search bar to find "Command Prompt" and then type the following command:
net view localhost
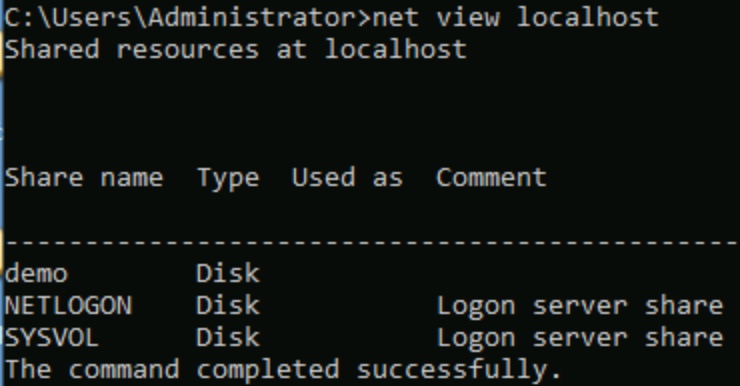
Figure 5: Use the net view localhost command to see shares on the local system
Note the demo folder in the above image.
This article covers three approaches to mapping shared network drives:
- Map a network drive using File Explorer
- Map a network drive using the net use command
- Map a network drive using the PowerShell New-PsDrive cmdlet
Note that the user will need to have the appropriate permissions to access the share. Some shares are password-protected, too.
What is a UNC path?
The key setting to understand when accessing Windows shares is the UNC path. UNC (or Universal Naming Convention) paths specify a format for accessing a shared folder from a network host. The syntax uses backslashes as delimiters.
\\servername-or-IP\sharename
For example, to connect to a server named fileserver01 that contains a shared folder named demo, type:
\\fileserver01\demo
Here's a useful trick: Specify the server by IP address rather than hostname. This approach prevents the path from relying on DNS name resolution, speeding up the connection and reducing the workload on name resolution servers. This best practice also simplifies troubleshooting. It's not much, but every little bit helps.
Here's what the UNC path to the demo folder would look like if fileserver01 had the IP address 192.168.10.17:
\\192.168.10.17\demo
You will use UNC paths regularly when mapping network drives, whether via File Explorer or from the command line.
Map a drive using File Explorer
Nearly all users and administrators will be comfortable with the Windows graphical interface, so it makes sense to start there. Only a few steps are needed to map a network drive. Before mapping drives, enable Network Discovery if it's not already running.
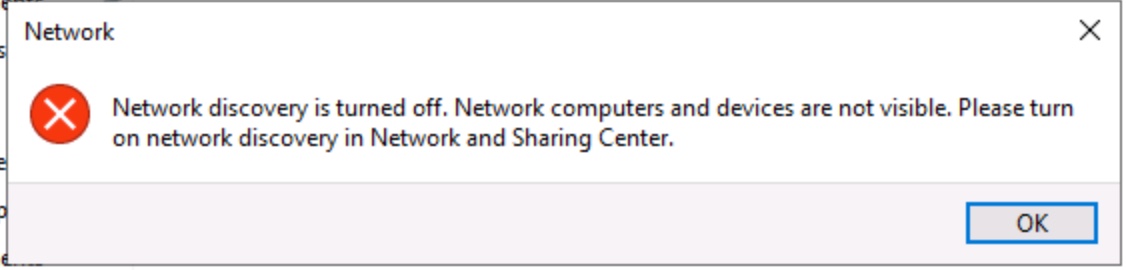
Figure 6: Warning message that Network Discovery is turned off
If you see this message, File Explorer should prompt you to enable Network Discovery. Otherwise, in the Network and Sharing Center, select Advanced sharing settings, then choose Turn on network discovery.
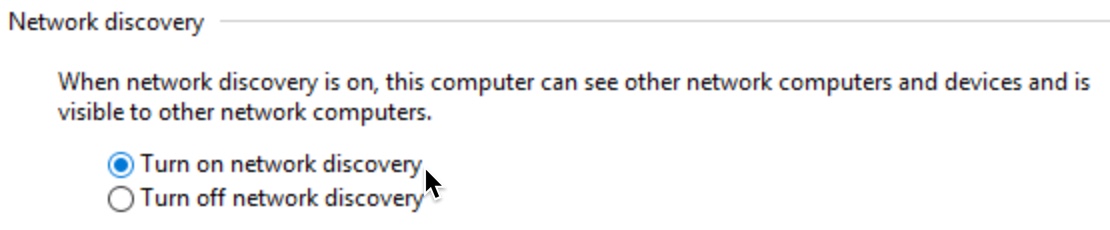
Figure 7: Turn on Network Discovery
On Windows 11, begin by opening Windows Explorer. Right-click the Network node and choose Show more options. Next, select Map Network Drive.
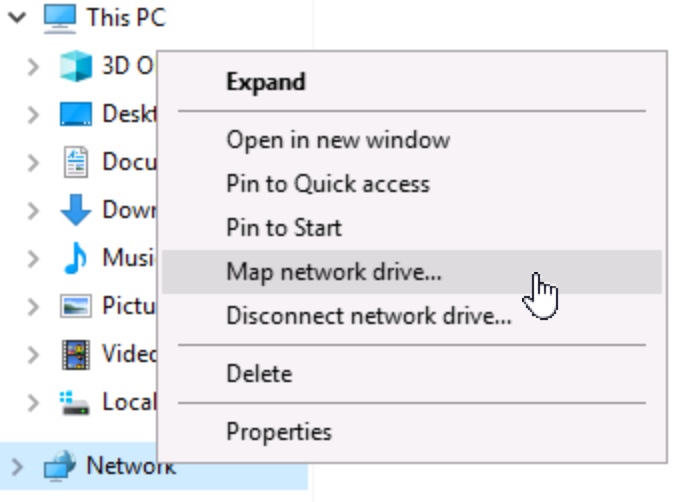
Figure 8: Select Map network drive in File Explorer
Select the drive letter, enter the UNC path, and select Reconnect at sign-in:
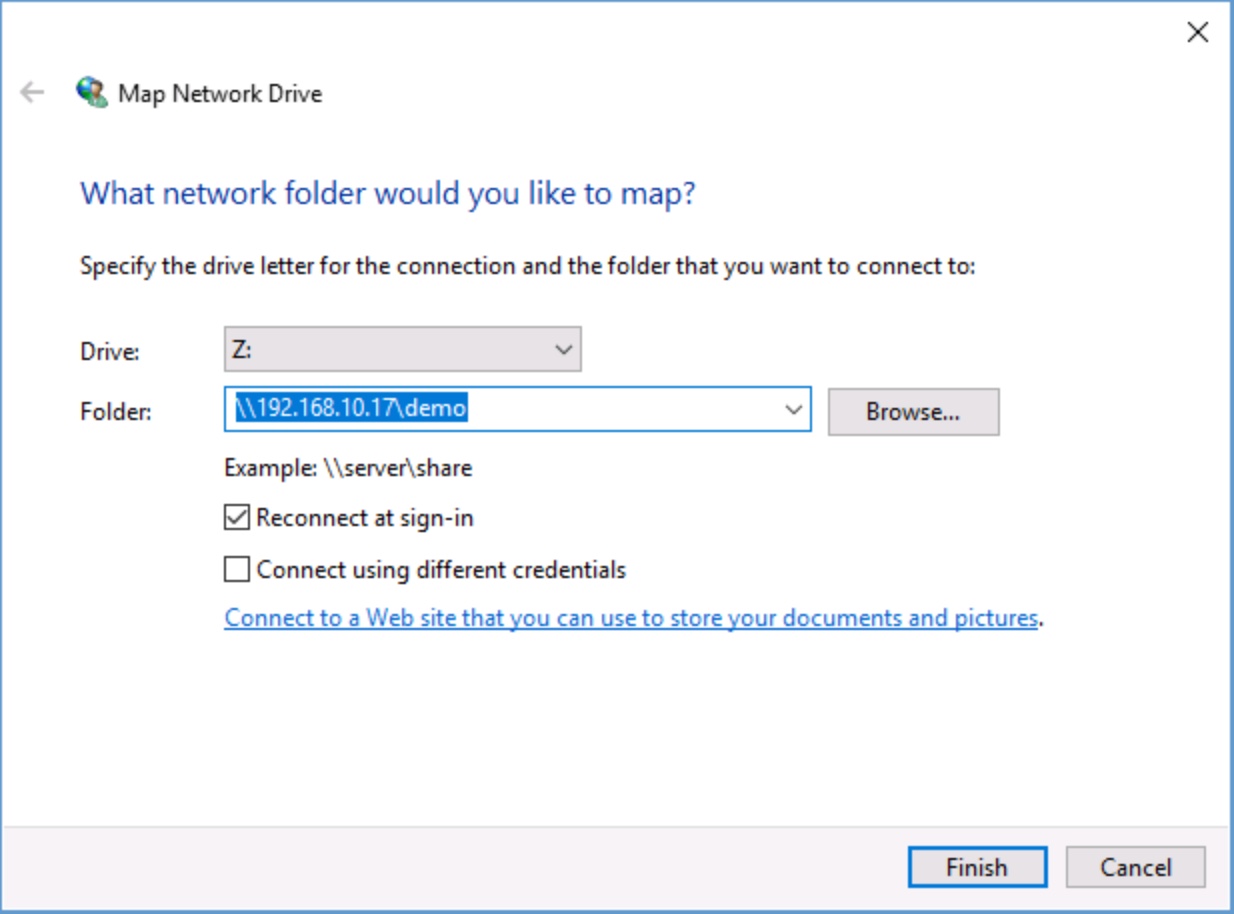
Figure 9: Primary interface for mapping a drive, including drive letter, UNC path and reconnect at next sign-in
You can now access the shared resources within the boundaries of NTFS and Share permissions. Windows makes the resource available at the assigned drive letter each time you log in.
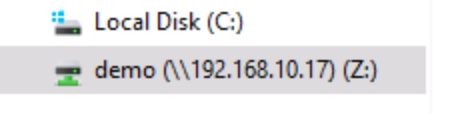
Figure 10: The mapped drive is now visible in File Explorer
If you need to disconnect or "unmap" the drive in the future, right-click the mapped drive icon and select Disconnect.
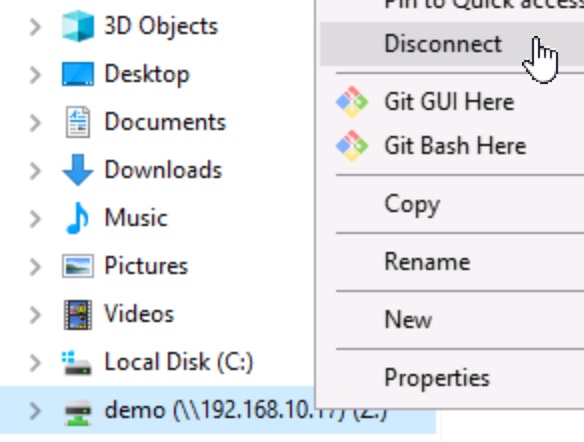
Figure 11: Disconnect the mapped drive if necessary
Map a drive using the net use command
Some administrators are comfortable using the command line for general tasks. Many standard system tasks can be accomplished more quickly from the command prompt rather than using the graphical interface (assuming you know the commands!). The net use command connects to remote systems to access shared resources.
Begin by opening the Command Prompt. Type "Command Prompt" in the Search bar to open the Terminal.
The following example shows the basic syntax for the net use command:
net use devicename unc /persistent
For example, to map a shared folder named demo from the fileserver01 (192.168.10.17) system to the local S: drive, type:
net use s: \\192.168.10.17\demo
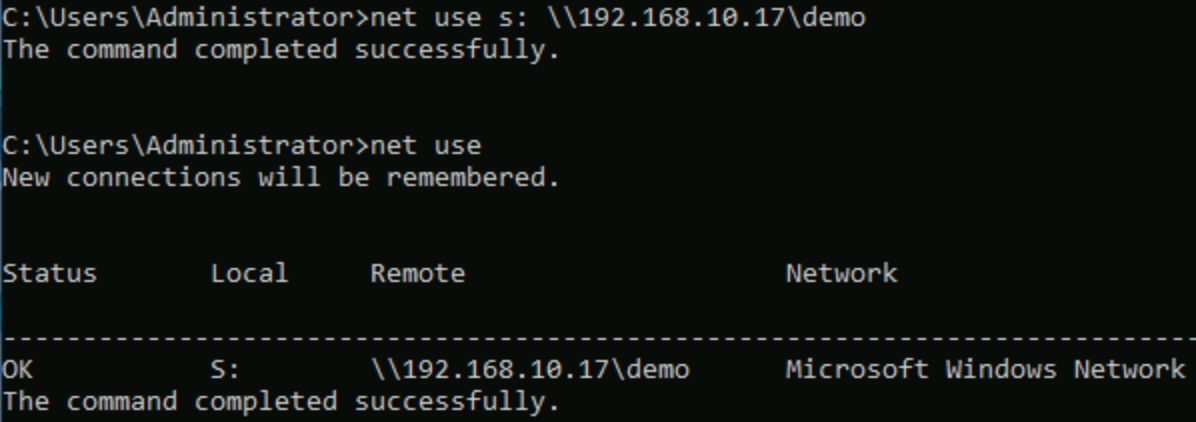
Figure 12: Map a drive using the net use command
This example is nonpersistent, meaning that Windows will not map the drive the next time the user logs on. This is handy for temporary, one-time shared folder access.
Persistent drive mappings
Most users will need the drive mapped persistently so that it is available any time they are on the system. Accomplish this by using the /persistent:yes flag, as seen below:
net use s: \\192.168.10.17\demo /persistent:yes
Figure 13: Make the mapping persistent across reboots
Note that you can shorten the /persistent switch to /p.
Display existing mappings
Running the net use command without arguments displays any currently mapped network drives on the local system.

Figure 14: Display mapped drives using net use and no switches
You can display shared folders on remote systems by using a portion of the UNC path and the net view command. For example, to show shared folders on the server at 192.168.10.17, type:
net view \\192.168.10.17
Remove a drive mapping
If the shared resource changes or the user's role no longer requires access to the content, simply remove the mapping using the /delete option. For example, to permanently disconnect from the share mapped to the S: drive, type:
net use s: /delete
The S: drive is now available for a different mapping.
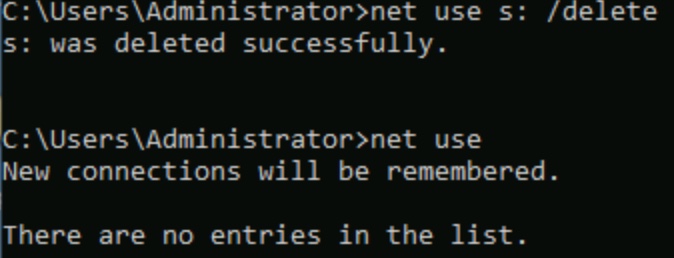
Figure 15: Remove a mapped drive using the net use command
Map a drive using PowerShell
Mapping a drive in PowerShell requires significantly more effort. The fundamental cmdlet is New-PSDrive. Additional criteria include the drive letter, the UNC path, provider, and persistence options.
New-PSDrive -Name "S" -PSProvider "FileSystem" -Root "\\192.168.10.17\demo" -persist
Figure 16: Use the New-PSDrive cmdlet to map a drive
- The -Name "S" parameter defines the local drive letter to map the remote share to.
- The -PSProvider "FileSystem" specifies the provider offering access to data stores; in this case, files in the filesystem.
- The -Root "\\192.168.10.17\demo" is the UNC path to the remote server and shared folder.
- The -persist parameter makes the mapping available whenever the user signs on.
Display existing mappings
Display existing mapped drives using the Get-PSDrive cmdlet.
Get-PSDrive -PSProvider "FileSystem"

Figure 17: Display mapped drives
Remove a drive mapping
The Remove-PSDrive cmdlet gets rid of the mapping.
Remove-PSDrive -Name "S"

Figure 18: Remove the network share using Remove-PSDrive
The net use and New-PSDrive commands allow administrators to create scripts that map drives. You can set scripts to run automatically when the user logs in or the system boots. They are usually part of a larger automation workflow, often for automated deployments.
Mapping home directories
One of the most common uses of mapped network drives is providing a centralized home directory for users. Remember, administrators usually want users to save business documents to network servers, which are secured and backed up regularly. Providing users with a safe and simple location for files is essential.
Active Directory even provides a quick mapping trick to get you going. In the properties of the user account, under the Profile tab, you can map a home folder for the user. This feature simplifies user management.
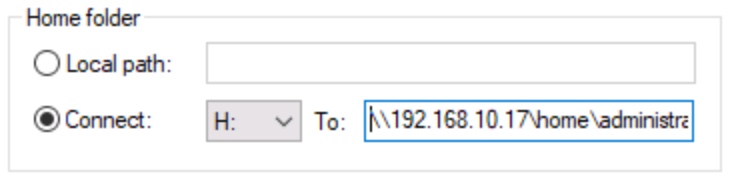
Figure 19: Automatically mapping home drives using Active Directory
Consider using basic mnemonics, such as associating the "home" directory with H:, the "sales" folder with S:, the "marketing" share with M:, and so forth.
Map your network devices
Windows administrators and power users will regularly map network drives to make remote shared data more easily accessible. Mapping the drive relates it to a drive letter that appears in File Explorer. Whether mapping the user's network home directory to the H: drive or associating the Sales department's data with the S: drive for the sales team, mapped network drives are crucial for making the information users need available.
Administrators first share data from centralized, secured file servers, setting NTFS and Share permissions to control access. They may then rely on the net use command or the New-PSDrive PowerShell cmdlet to map drives from the command line or via scripts. Mappings can also be made through the graphical interface using File Explorer. One key decision point is whether to automatically connect each time the user logs in. The answer to that question will most likely be "yes."
Get the in-demand skills you need with CompTIA certifications and training solutions. Get started.